Proper lighting transforms a kitchen island from a prep surface into the heart of your home. Underlit islands become shadowy work zones and visual dead spots, while poorly chosen fixtures clash with your design and strain your eyes. Getting it right means balancing task lighting, ambient brightness, and aesthetics in one compact space. This guide walks you through selecting the right fixtures, sizing them correctly for your island’s dimensions, and installing them safely so your kitchen works as hard as you do.
Table of Contents
ToggleKey Takeaways
- Kitchen island lights serve three critical functions: illuminating your work surface for safety, brightening the entire kitchen, and creating ambiance for dining and entertaining.
- Pendant lights are the gold standard for kitchen island lighting because they hang at eye level, cast light directly onto the work surface, and complement various design styles from farmhouse to modern.
- Proper sizing and spacing matter: pendant diameter should be one-third of your island’s width, fixtures should hang 30–36 inches above the countertop, and multiple pendants should be evenly spaced to avoid dark patches.
- Before installing kitchen island lights, turn off power at the breaker and use a voltage tester to ensure no electricity is present—this is a non-negotiable safety step.
- If running new wiring for island lights requires cutting into your ceiling and fishing cable through joists, hiring a licensed electrician is often worth the cost for safety and compliance with local building codes.
Why Kitchen Island Lighting Matters
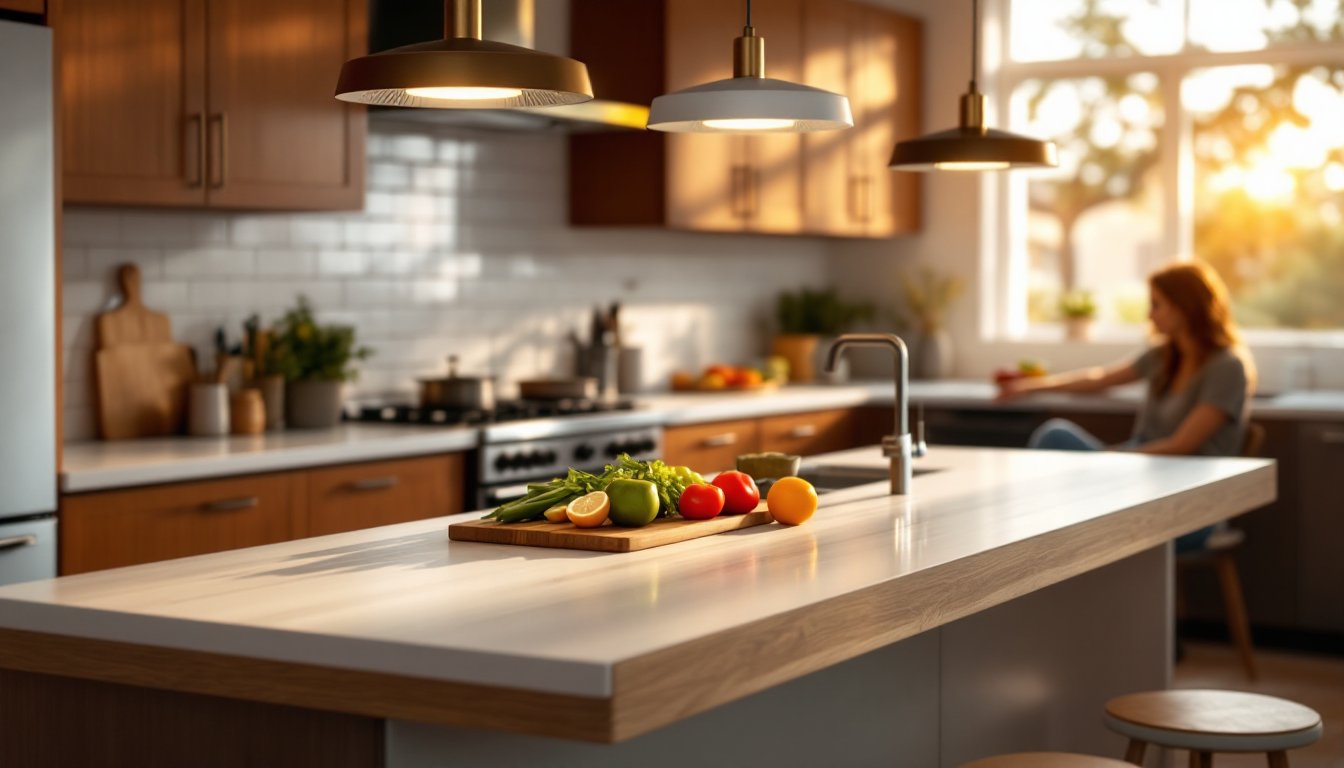
Your island lighting serves three jobs at once: it illuminates the work surface for chopping, mixing, and plating: it bounces light into the room to brighten the whole kitchen: and it sets the mood for dining and entertaining. Poor lighting here creates shadows across your workspace, a real safety issue when you’re handling sharp knives or hot pans. Beyond function, island lighting anchors the visual design of the space. Fixtures that complement your cabinet style, countertop material, and overall aesthetic tie the room together, while mismatched or undersized lights feel like an afterthought. Builders and designers often skimp on island lighting because it requires more planning and careful electrical work than a simple overhead fixture. That’s your opportunity to get it right.
Types of Kitchen Island Lights to Consider
Pendant Lights and Suspension Systems
Pendant lights are the gold standard for islands because they hang at eye level or slightly below, casting light directly onto the work surface while keeping the rest of the kitchen open and uncluttered. A typical island setup uses two to four pendants spaced evenly along the length, we’ll cover spacing in detail later. Single pendants work only for very small islands (under 3 feet). Pendant styles range from industrial metal shades to frosted glass to fabric drums, so you’ll find options that match farmhouse, modern, mid-century, or transitional kitchens. Materials matter too: a glass pendant diffuses light evenly, while a metal shade with an open bottom directs light downward and is easier to clean. Installation involves hanging fixtures from the existing island electrical circuit or running new wire if none exists, this is where a licensed electrician often makes sense, especially if you’re running new cable through your joists.
Suspension systems are multi-pendant setups hung from a single adjustable cable or rod, which gives you flexibility if you ever want to raise, lower, or reposition the lights. They’re trickier to install and tend to cost more, but they’re worth considering if your island’s height or seating arrangement might change, or if you have a very long island (6 feet or more) and want a unified look.
Track and Recessed Lighting Options
Track lighting runs a powered rail across your island’s underside or into the ceiling, with individual spotlights you can aim and adjust. It’s ideal if you want maximum flexibility without committing to a fixed pendant location. Track systems are easier to modify than hard-wired pendants, you can swap fixtures or reposition them without cutting drywall. The downside: track looks more industrial and can feel like overkill for a residential kitchen. It also requires clean installation in the ceiling soffit, and you’ll see the wiring and fixtures more prominently.
Recessed lights (downlights) sink flush into the ceiling above your island. They’re clean and invisible, perfect for minimalist kitchens, but they sit too high to light the work surface as effectively as pendants. Recessed lights work best as ambient lighting paired with under-cabinet or pendant task lights. Installing new recessed fixtures means cutting holes in the ceiling and running wiring, a bigger structural commitment than hanging pendants. If your ceiling is open (vaulted or cathedral), you’ll need slope-rated recessed cans that sit at an angle: standard cans won’t work and will create fire hazards. Some recessed fixtures let you aim or tilt the light, which helps, but they’ll never match the direct, even illumination of a well-placed pendant.
Sizing, Height, and Spacing Your Island Fixtures
Undersized pendants look skimpy and fail to light the space: oversized ones block sightlines and overwhelm the island. A good rule: pendant diameter should be one-third of your island’s width. So a 3-foot-wide island works well with 12-inch diameter shades: a 4-foot island pairs nicely with 14-16-inch shades. If you have four small pendants instead of two large ones, use shades about 8-10 inches wide.
Height is critical. Island pendants should hang 30 to 36 inches above the countertop surface. This clears sightlines for seated diners while keeping light focused on the work surface. If your ceiling is low (less than 8 feet to the bottom of the joists), aim for the 30-inch mark. Vaulted ceilings give you more freedom: 36 inches or even lower works if your fixture has a downward-facing shade that directs light efficiently.
Spacing between pendants matters too. For two pendants, center them on the island, if your island is 4 feet wide, hang one 2 feet from each end. For three pendants, space them evenly: 2 feet apart, for example, on a 6-foot island. Four pendants on a long island work best at 18 to 24 inches apart. Don’t cluster lights too close together: that creates shadows and wastes fixture count. And don’t space them so far apart that the work surface has dark patches between them.
When measuring, account for pendant cord or chain length. Most pendants ship with 12 to 18 inches of suspender: if your ceiling is higher or lower than expected, you’ll need adjustable hardware or longer/shorter cord. Many retailers sell replacement chains and suspension kits separately, worth checking before you order. A quick electrical note: verify your island’s existing circuit can handle the amperage of your new lights. LED pendants draw very little power, so a standard 15-amp circuit usually handles 3-4 fixtures. Incandescent or halogen shades draw more: if you’re using those, verify with a multimeter or call an electrician.
Installation Tips for DIY Success
Before you touch a wire, turn off power at the breaker and use a non-contact voltage tester to confirm no electricity is present. This is non-negotiable.
If you’re hanging pendants on an existing fixture, removing the old light is straightforward: disconnect the wires (usually marked black/live, white/neutral, and bare copper/ground), unbolt the mounting bracket from the ceiling, and save the hardware, you may reuse it. If there’s no existing fixture, you’re running new wire, which requires opening the ceiling and fishing cable through joists or conduit. This is where most DIYers hit a wall and decide to hire an electrician. Running new circuits through a finished ceiling is doable but messy: you’ll cut holes, patch drywall, and risk hitting plumbing or HVAC ducts. That said, if your island has no power at all, it’s a project worth tackling if you’re comfortable with basic carpentry and electrical basics. Check your local building code to confirm whether your wiring method (in-wall romex, rigid conduit, or cable tray) is permitted: some jurisdictions restrict how you run residential wire in kitchens.
When installing the new fixture, mount the hanging hardware securely to a joist or add a fan brace between joists if necessary. Pendants create a cantilevered load above the island: a loose bracket eventually fails and your light falls. Use appropriate fasteners: lag bolts into wood, or toggle bolts through drywall if you can’t hit a joist. Ensure wires are twisted properly (twist clockwise, then wrap with electrical tape or use wire connectors rated for the gauge and wire count). Test before you seal anything up, flip the breaker and confirm the light works before you patch the ceiling or remove scaffolding.
Wearing safety glasses and work gloves protects your eyes from dust and cuts when working overhead. If you’re running new wire and cutting into the ceiling, a dust mask and eye protection are essential: insulation and drywall dust irritate lungs and eyes. And give yourself a day off after installation: wiring and overhead work are tiring, and fatigue leads to mistakes. Interior design resources like 75 Kitchen Island Lighting Ideas You’ll Love showcase professionally installed examples that may inspire sizing and spacing choices for your own project.
Conclusion
Island lighting is one of the highest-impact upgrades you can make in a kitchen, combining function and design in a visible, daily-use fixture. Start by honestly assessing whether you’re comfortable with the electrical side: if not, a licensed electrician’s cost is worth it for safety and peace of mind. Size your fixtures to your island’s width, hang them at the right height, space them logically, and you’ll have task lighting that works as hard as you do, and looks great doing it.